Many Samsung user don’t know how to installation firmware for her smartphone, i think this is something that needs to be known by every user, if at one day their phones there was a problem, such as could not get into the Home screen / Boot loop, stuck on logo, can not return to the factory mode or even damaged partition so that the phone they have hardbrick.
Follow the step-by-step guide below to get started
How to installation firmware using ODIN on Any Samsung device
Disclaimer :
This guide for educational purpose only, I am not responsible if your device increasingly problematic after following this tutorial. (Do With Your Own Risk )
This guide for educational purpose only, I am not responsible if your device increasingly problematic after following this tutorial. (Do With Your Own Risk )
Preparation stages :
Download all files of below :
- Download Your Original Stock Firmware ↦ usually, consists of a PDA, AP, Modem, Phone, CP, BL, Bootloader, and CSC file depends on the type of your samsung.
- Download Samsung USB Driver.zip ↦ Usb driver for all Samsung device, if you already installed KIES on your computer than this download can be ignore.
- Download Odin3 Latest version the Samsung Android Flashing tools↦ this is a latest version of Odin3 tool flasher for update firmware your Samsung devices
- Install Samsung USB Driver on your computer and make sure it completely work.
- Run Odin3.exe, and leave it open on your desktop.
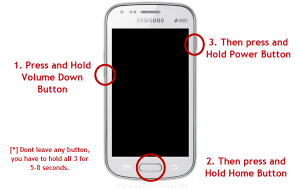
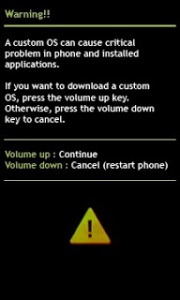
- Now turn off your device, after completely turn off press and hold Volume Down + Home + Power button until you can see Warning Sign. see simulations below….
- On Download Mode windows press Volume Up and then connect your device to computer.
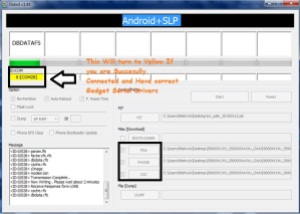
- If Samsung USB Driver already install right on your computer then Odin3 will recognize your device as another COM Port.
- Next, check the “Auto Reboot” and “F. Reset Time” options in Odin Tool. Note : DO NOT PUT .PIT FILE AND DO NOT, I REPEAT, DO NOT TICK REPARTITION.
- If your ROM is a single .tar.md5 package click on the AP/PDA button and browse to the .tar or .tar.md5 file that you extracted in step 1 and select it.
- If the package has more than one .tar archive then they will be
labelled with PDA/Code, Phone/Modem and CSC. Just put them in the
corresponding section of Odin like below
BL = Bootloader
AP = PDA (CODE)
CP = PHONE (MODEM)
CSC = CSC
- Finally press the start button to begin flashing the firmware update on your device.
- Done, now you can disconnect your device.


Enregistrer un commentaire